")
If someone tells you that crunches are the best way to build core strength, they are wrong, they are not giving you the full picture.
Crunches target the rectus abdominis, the muscle that runs down the front of your stomach. And yes, those muscles are important. But your core is a complete team: your deep abdominals, your obliques, your glutes, your back muscles. They work together to stabilize your spine, maintain your balance, and help you navigate real life without throwing your back out picking up a grocery bag.
As a trainer for 60 years, I can tell you this: train your core work it’s what actually changes how you feel from day to day.
The good news? You don’t need any equipment or a gym membership to train it properly. These five steps are some of my favorites for building a strong, stable, functional core at home. They are also a lot more fun than doing crunch number 47.
Why Crunches Alone Are Not Enough
Hollywood has been selling us the six-pack culture for decades, and at some point many women decided that crunches were the go-to workout. But here’s what I want you to understand: a strong core isn’t about the muscle you can see.
It’s about the muscles that do their job when you’re carrying groceries, chasing a grandchild, getting out of a chair, or standing on your feet all day. Those muscles live deep, and the patches don’t touch them.
Active core training means teaching your muscles to stabilize and control movement, not just curl up and down. These five exercises do just that. You’ll feel it in places that crunches never reached, and your body will thank you for it.
Sets: 2–3 | Reps: 8–10 per side | Relaxation: 30 seconds
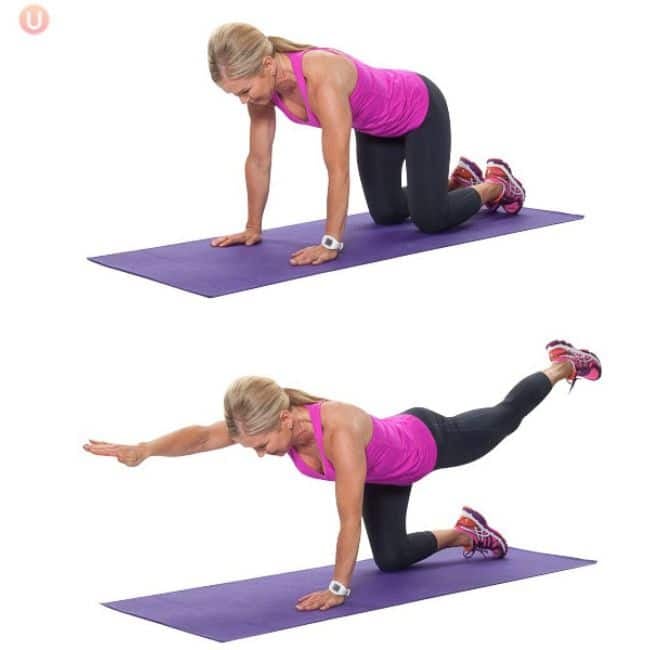
This one is a personal favorite because it does so much at once. Bird dog builds coordination, trains the deep muscles in your spine, and activates your horizontal abdominis (a deep muscle, sometimes called the “inner corset”).
It’s also good for standing, which most of us could use less of. The key is slow and manageable. This is not a rush job.
How to make Bird Dog:
- Start on hands and knees, hands directly under your shoulders, knees under your hips.
- Engage your core, imagine pulling your belly button gently towards your spine.
- Extend your left arm straight forward and your right leg straight back at the same time, making one long line from your toes to your heel. Keep your hips level. Don’t let one side dip.
- Pause at the top, then regain control and switch sides.
- Continue alternating with each rep.
Form tip: Keep your eyes down rather than forward. It will help keep your neck neutral and your spine long.
Check out some posture exercises to build muscle and get taller.
Sets: 2–3 | Reps: 10–12 | Relaxation: 30-60 seconds
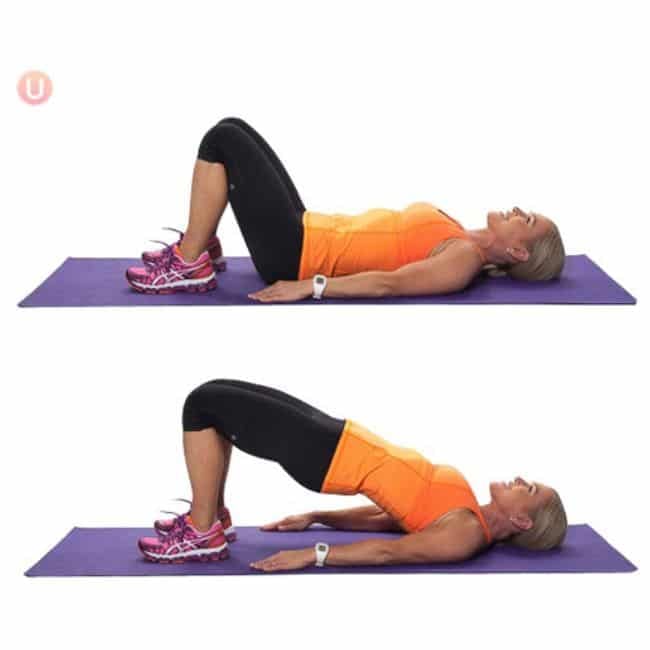
Don’t let the name fool you, glute bridges are an important exercise. When you lift your hips, your glutes and core must work together to keep your pelvis stable and your lower back in tension. That combination is exactly what protects you from lower back pain, which is one of the most common complaints I hear from middle-aged women.
This move is also beginner-friendly, interactive, and you can do it while you sleep in your living room. The best part? Your glutes will burn in the best possible way.
How to do the Glute Bridge:
- Lie on your back with your knees bent and your feet flat on the floor, hip width apart.
- Engage your core.
- Press through your heels to lift your hips until your body forms a straight line from your shoulders to your knees.
- Squeeze your glutes up and pause for a second before lowering slowly.
Form tip: Notice the opening of the ribs as you lift. Keep your ribs down and your lower back from over arching.
Sets: 2–3 | Time: 20–30 seconds on each side | Relaxation: 30–45 seconds
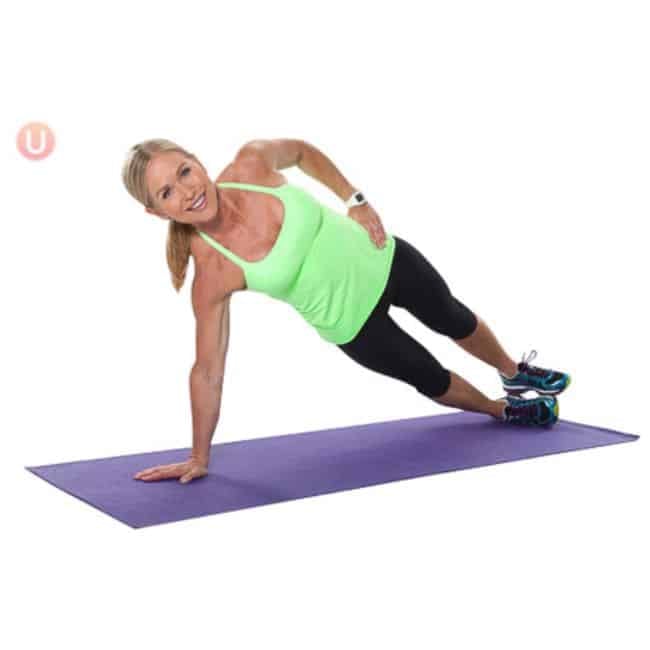
Crunches work the front of your spine. Side planks work your sides, obliques and deep lateral stabilizers, which are the muscles that keep you upright, protect your hips, and improve your lateral strength.
In real life, your core must withstand forces from all directions, not just front to back. This walk trains that. It also builds what I like to call injury resilience: the kind of strength that keeps you up and out of the physical therapist’s office.
How to Make a Side Plank:
- Lie on your side, leaning with one elbow directly under your shoulder. Put your feet up.
- Engage your spine and lift your hips off the floor until your body forms one straight line.
- Hold the position, then switch sides.
Make it easy: Bend your knees and keep them on the ground as you lift your hips. This is a nice change if you are new to this move, you will still feel those holes working.
Sets: 2–3 | Reps: 10–12 | Relaxation: 30 seconds
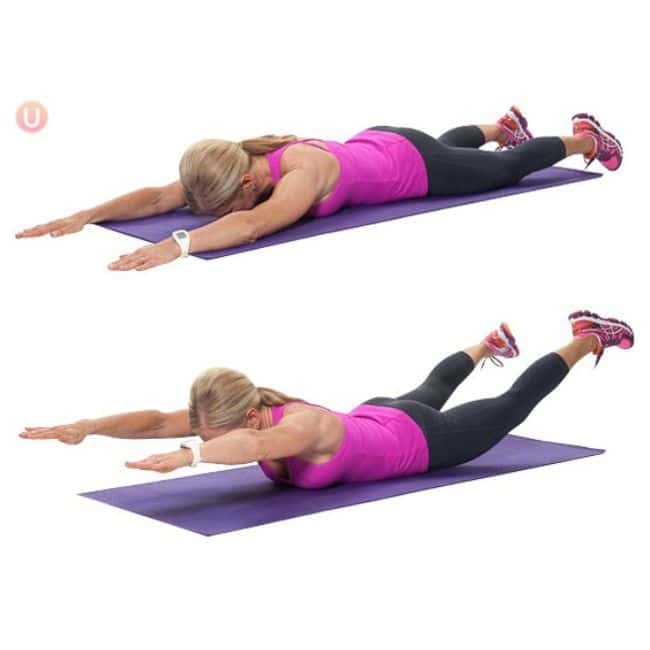
Many core exercises train the front of your body. Superman turns that around, literally, and works the back side: your lower back, glutes, and the muscles that run through your spine. Those muscles are as much a part of your spine as your abs, and when they’re weak, your posture suffers and your lower back pays the price.
This move is easy, requires zero equipment, and is a great countermeasure for most of us who sit during the day.
How to make Superman:
- Lie face down with your legs extended and your arms extended overhead. Draw your belly button up from the bottom.
- Engage your abs, back muscles, and glutes, and lift your arms and legs simultaneously off the floor. Keep your eyes down, don’t lift your neck up.
- Hold briefly at the top, then lower down with control.
Form tip: Focus on length, not length. You don’t need to lift up, just long. Think about reaching your fingers and toes in opposite directions as you hold.

Sets: 2–3 | Time: 20-45 second | Relaxation: 30-60 seconds
Yes, you probably already know the plank. But I’d be leaving something out of this list if I didn’t include it, because it deserves its place every time. The arm plank is one of the most complete exercises there is, it trains your flexor abdominis, your rectus abdominis, your obliques, your glutes, and your back muscles all at the same time, in an isometric grip that shows how your spine actually works in real life (holding tight under the load, not curling up and down).
And it builds the kind of basic endurance that makes everything else easier: carrying things, standing for long periods of time, holding your posture at your desk. Don’t skip it.
How to Do a Forearm Plank:
- Start face down, arms down, elbows directly under your shoulders, hands on the floor, shoulder width apart.
- Engage your spine, then press down with your arms and lift your body off the floor. You are supported by your arms and toes.
- Keep your body in one straight line from head to heels. Pull your navel into your spine and squeeze your glutes to prevent your hips from falling or rising.
- Hold for 20 to 45 seconds, or longer if you feel strong.
Correction: Bend your knees if you feel any pressure in your lower back or you can’t keep your hips in line with your shoulders. A solid knee plank in good shape beats a sloppy full plank every now and then.
How to Incorporate This into Training
You can do all five of these moves back to back as a stand-alone core routine (taking about 15 to 20 minutes), or hold two or three of them at the end of a strength training session as your main supplement. Aim to hit this routine two or three times a week for best results.
Your body won’t change overnight, but a few weeks later, you’ll notice things: your posture is straighter, your back feels more supported, your balance is sharper. That is the work force doing its job.
All you need is a yoga mat and about 15 minutes. No gym, no equipment, no excuses (I mean that with love).
The moral of the story? Crunches are not a criminal. They are just not the whole story. Your core deserves a full workout, and these five moves are a great place to give it to you. Grab your mat, try the routine this week, and let me know in the comments which one you hear the most!
PS. Looking for a full core workout to go with it? Check out Get Healthy U TV, we have essential workouts, strength training, and more for women who want to feel strong at all ages.
Frequently Asked Questions
Two to three times a week is the sweet spot for most women. Your core muscles respond well to consistency, and require little recovery time between sessions, especially deep stabilizers. You don’t need to do an hour long core class. Even 15 focused minutes two or three times a week adds up to a lot in the long run.
They can, of course, but always check with your doctor or physical therapist if you’re dealing with a specific injury or chronic pain. In general, strengthening the deep muscles of the spine (especially the flexors of the abdomen and glutes) takes a lot of pressure on the lower back. The dead bug and bird dog in particular are walks that are often recommended by physical therapists for this reason. That said, start gently and stop if something hurts.
Definitely. Every move on this list has a beginner-friendly entry point. Adjust the side plank to your knees, slow the movement down to deadlifts, and hold the plank for just 10 or 15 seconds at first. Start where you are. That’s always a good start.
Yes, and I would actually say that they are very important during and after menopause. Hormonal changes can affect spinal stability, pelvic floor function, and posture. Building an effective core strength at this stage of life supports all of that. These moves are low-impact, consistent, and built for real-life strength, just what midlife women need.


